Mastering Focus: Because Sharpness Matters
Our second Volcán Photo Club session, held on the 30th of July at Panamera, was all about focusing — and why getting it right makes all the difference.
We began by talking through the three main focusing modes found on most cameras: single focus (AF-S or One Shot), continuous focus (AF-C or AI Servo), and manual focus. Each has its place depending on what you’re photographing. Single focus is great for portraits and still subjects, while continuous focus is ideal when you’re tracking motion — kids running, birds flying, or football being played. Manual focus is sometimes the best choice in tricky conditions: low light, close-ups, or when the autofocus just doesn’t want to cooperate.
One of the key takeaways from this session was that while you can often fix poor exposure in post-processing, a missed focus usually means a lost image. I shared two photos taken within seconds of each other: one — a well-focused portrait of my daughter; the other — a photo of both of us taken by a friend, but unfortunately out of focus. That second image, while full of emotion, couldn’t be rescued — a clear reminder that sharpness matters.

correct sharp focus – locked on the eyes
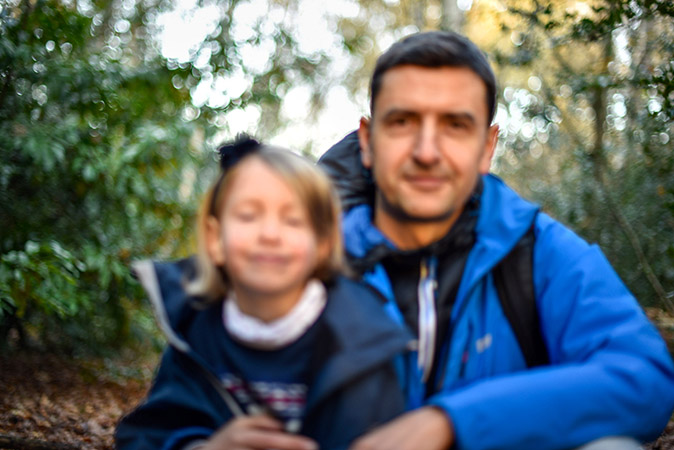
missed focus – ruined photos
Finding Focus, Practically
We explored the “focus lock and recompose” technique, especially useful for DSLR users whose cameras may have a limited number of focus points. It’s a simple but powerful method: lock focus on your subject by half-pressing the shutter, then reframe your composition before taking the shot. It’s an essential skill when your camera doesn’t offer the flexibility of newer systems.
We also looked at how to move focus points manually and why that matters. Too often, people let the camera choose what’s sharp — usually whatever’s in the middle — but once you learn to move focus points, you take back creative control. We compared how this works on DSLRs (with fewer, centre-weighted points) versus mirrorless cameras, which typically offer full-frame coverage, subject tracking, and eye-detection technology.
To bring all this theory to life, we spent time doing practical exercises — testing AF-S vs. AF-C, tracking moving subjects, and even giving manual focus a try in more controlled conditions. Everyone started to see how their camera behaves and how much difference a little intention can make.
Before wrapping up, I gave a simple challenge for next time: photograph something in motion — dogs, people, traffic, or anything that moves — and try to either freeze or blur the action intentionally. Whether the photos turn out well or not isn’t the point. It’s about testing the limits of your camera, exploring what’s possible, and learning through doing.
Bonus Tip: How to Get That Blurry Background (and Why It Matters)
Many people who come to my photography courses in London — and now to Photo Club — often ask: How do I get that blurry background that makes my subject stand out? So I shared one of my favourite little exercises to explain the concept.
I showed two photos of pigeons. In the first, they’re walking on the grass and the photo was taken from above, using a wide-angle lens (24mm) and f/4 aperture. The background — pavement and grass — was close behind them, and the pigeons look small and distant. The result? Everything is sharp, flat, and not very interesting.
In the second photo, I completely changed my approach — but used the same aperture (f/4). This time, I got down to the same level as the birds, moved in much closer, and zoomed to 120mm. Now the main pigeon fills the frame, and the background — distant trees and foliage — is beautifully blurred. Even the other pigeons behind the first one appear soft, directing all attention to the subject.
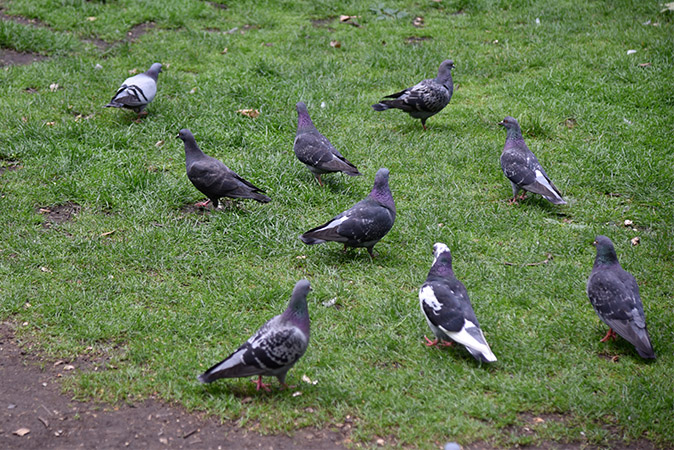
Pigeons look small and distant. The result? Flat, and not very interesting image.
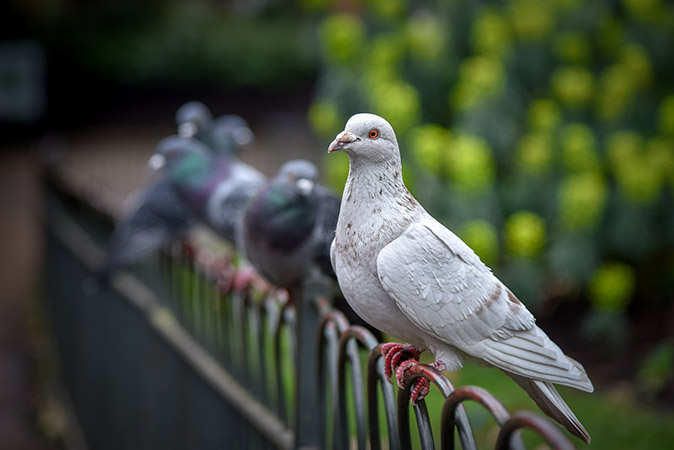
Only one pigeon is sharp, background is beautifully blurred.
Here’s the “secret formula” :
👉 Get close
👉 Use a zoom lens (longer focal length)
👉 Be on the same level as your subject
👉 Use a wide aperture (e.g., f/2.8–f/4)
👉 Keep your subject far from the background
With these 5 steps, you’re forcing the camera to create that beautiful shallow depth of field — instead of hoping it happens.
Try it with pets, portraits, flowers, or even birds in the street. It’s one of those “aha” moments that really unlocks a new level of control and creativity.
— Roland